How to Hang Curtains With and Without Drilling

Knowing how to hang curtains the right way starts with the right measurements, the right hardware, and the right installation method for your space. This guide covers everything you need to hang curtains with or without drilling, from measuring your windows to choosing a curtain rod to installing your brackets step by step.
Below we'll cover:
- How to measure for curtains
- How to choose the right curtain rod and brackets
- How to hang curtains with drilling
- How to hang curtains without drilling (using Kwik-Hang no-drill brackets)
- Curtain hanging tips and dos and don'ts
- Frequently asked questions
Measure for Curtains in 5 Steps
Getting the correct measurements is the key to curtains that look great and function properly. A mistake here can leave you with curtains that are too short, too long, too narrow, or too wide.
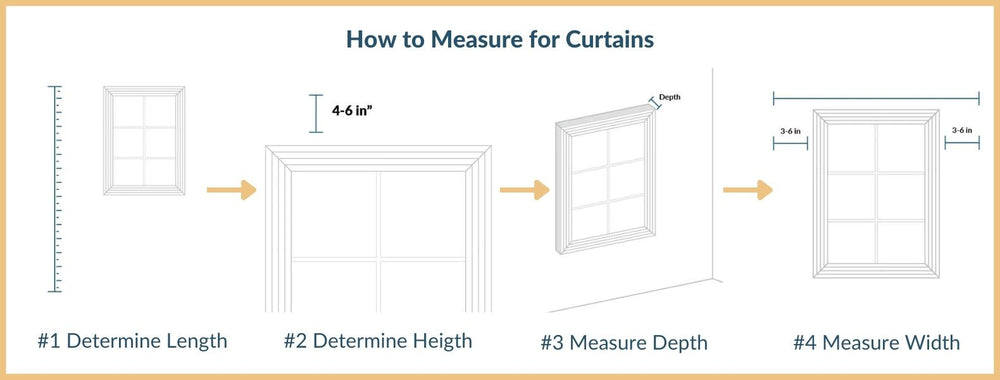
Decide on Curtain Length & Style
- Float: Curtains hover less than one inch above the floor.
- Kiss: Curtains gently touch the floor.
- Puddle: Curtains extend slightly past the floor for a dramatic effect.
Start by deciding on the length and style of your curtains. If you want a modern, crisp look, you might opt for curtains that “float” just above the floor. If you prefer a more elegant touch, allowing the fabric to “kiss” the floor or “puddle” slightly can create a luxurious effect.
To get the right length, measure from the floor to where your curtain rod will be mounted, keeping in mind standard curtain lengths: 63, 84, 96, 108, and 120 inches.
Read more: Curtain Length Rules for Every Type of Window
Determine Curtain Height
Next, determine the ideal height for your curtain rod. A general rule of thumb is to hang rods 4 to 6 inches above the window frame to create the illusion of taller ceilings. If your windows have trim, you have the option to install brackets directly onto it and save yourself the trouble of measuring (more on that later).
Measure Window Depth
- Brackets should extend past the window molding so curtains hang properly.
- The curtain style you choose matters—rod pocket curtains require less depth than grommet-style curtains.
The depth of your window also matters. This will determine the type of curtain rod brackets you need. If your brackets don’t extend past the window molding, your curtains may not hang properly. Additionally, your choice of curtains affects how much space you need—rod pocket curtains require less depth than grommet-style curtains.
Determine Curtain Width
- Curtains should extend 3-6 inches beyond each side of the window for full coverage.
- For a luxurious, full look, use curtains that are twice the width of the window.
Width is just as important as height. To achieve a full and polished look, your curtains should extend three to six inches beyond each side of the window. If you plan to fully close them, aim for curtains that are at least twice the width of the window for a luxurious drape. You can round down if you’re not planning on closing your curtains or have pleated panels.
Depending on the size of your window, you may need to buy multiple curtain panels, an extra long curtain rod and center support brackets.
Choose the Right Curtain Rod & Brackets
- Curtain rod types: Standard adjustable rods, double rods (for layering), tension rods, or wraparound rods.
- Brackets: Available in 5/8-inch or 1-inch widths.
- Support brackets: Use center brackets for extra-wide windows to prevent sagging.
Popular curtain rod styles include standard adjustable rods, double rods (which help you layer curtains), tension rods and wraparound rods. The curtain rod style you choose will dictate the type of curtain rod bracket you’ll need.
In addition, the diameter of your curtain rods will determine the size of the curtain rod brackets you’ll need. Brackets are available in two standard widths that “cradle” your curtain rod and hold it in place: 5/8-inch and 1-inch.
How to Hang Curtains With Drilling
Before you start, here’s what you’ll need:
- Screws
- Tape measure
- Level
- Stud finder
- Screwdriver or drill
- Pencil
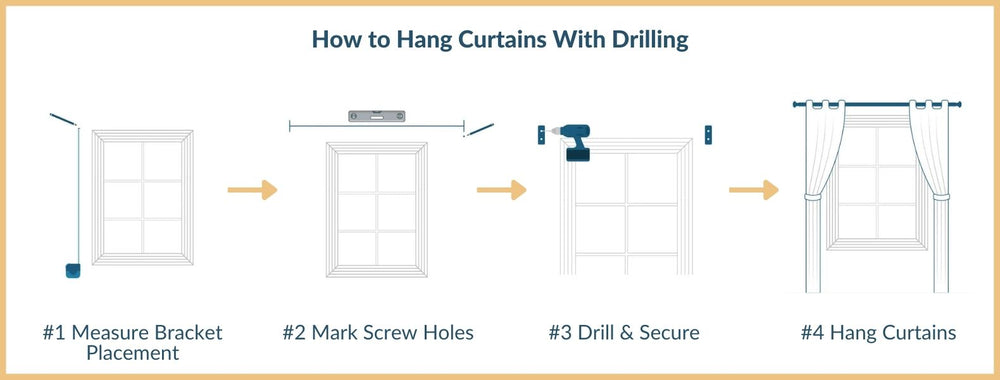
1. Measure for Bracket Placement
With your curtain style in mind, measure the height where you want your curtain panels to hang. Use a level to ensure straight alignment.
2. Mark Bracket Placement
Start by measuring and marking where your brackets will go. Use a tape measure and pencil to mark their placement on the wall, then a level to ensure they’re straight—crooked curtains can be a hassle to fix later.
Begin with the right side: Position the bracket over the center of your mark, then use a level to confirm alignment. Finally, mark the screw holes with a pencil.
3. Install Bracket
Once marked, use a stud finder to locate studs. If no studs are available, install wall anchors to ensure the brackets stay secure.
Drill pilot holes for the screws with a 1/8" bit. Insert the screws into the holes, leaving 1/4" of the screw sticking out. Slide the bracket onto the screws and tighten the screws to secure the bracket to the frame.
4. Level and Install the Other Bracket
Place the curtain rod into the right bracket. Use a level to determine the placement of the left bracket. Repeat steps 2-3 to secure the bracket to the frame.
5. Hang Your Curtains
Once your brackets are secure, slide the curtains onto the rod and place the rod into the brackets. Adjust as needed to make sure the curtains fall evenly.
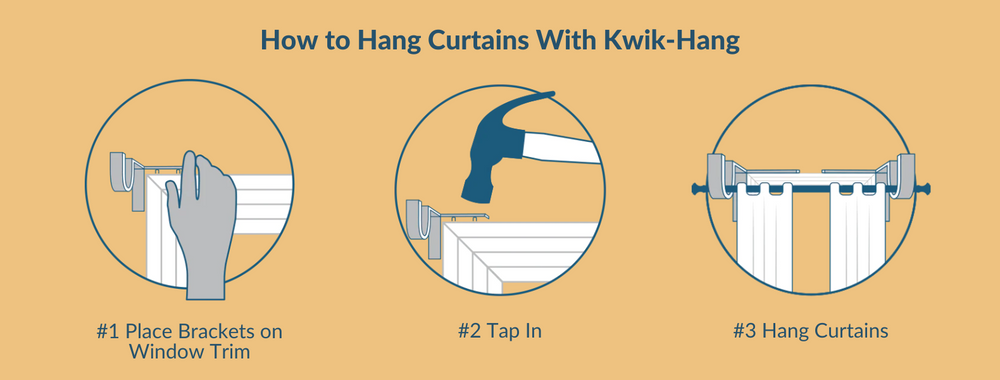
How to Hang Curtains Without Drilling
Start by skipping the tools you don’t need: no drill, no level, no wall anchors. Here’s what actually goes into a Kwik-Hang install:
- Kwik-Hang single rod brackets or double rod brackets (sold in sets of two)
- A curtain rod (5/8” for sheers and light curtains; 1” for heavy drapes)
- Your curtain panels
- A hammer — optional for harder wood trim, but most installs need just your hand
Important: Kwik-Hang brackets are designed for windows with wooden trim or casing. They’re not compatible with oak, PVC, MDF, metal, or plastic trim. Check your window frame before ordering.
Step 1 — Place the Bracket
Hold the bracket at the top corner of your window casing, right where the trim meets the wall. No measuring. No marking. No pilot holes. Just position it where you want the rod to sit and hold it in place.
Step 2 — Tap It In
Press the bracket firmly into the window trim by hand, or give it a few gentle taps with a hammer. The built-in pins grip the wood securely without screws, nails, or anything in your wall.
Step 3 — Hang Your Curtains
Thread your curtain panels onto the rod, and rest the rod in the brackets. Step back. You just hung curtains in under a minute, and your walls are still perfect!
Why No-Drill Brackets Are Better for Renters and Homeowners
Traditional curtain brackets require a drill, a level, wall anchors, and the patience to patch holes when you move out. Kwik-Hang’s no-drill brackets skip all of that.
- No holes in walls or woodwork — your security deposit stays safe
- Holds up to 20 lbs — strong enough for heavy-lined drapes, not just sheers
- Removes cleanly — lift out the bracket, and the trim looks untouched
- Patented tap-and-go design — the original no-drill bracket (not a knockoff)
- Five finishes: Matte Black, Silver, Brass, White, and Bronze to match any decor
- Made in the USA — 100% manufactured in North Attleboro, Massachusetts
Over 25,000 customers have used Kwik-Hang brackets to hang curtains without drilling. Plus, we’ve been featured on Shark Tank and the Today Show
Shop Single Brackets — Shop Double Rod Brackets
Curtain Hanging Tips for the Best Results
Keep these tips in mind when you’re hanging curtains.
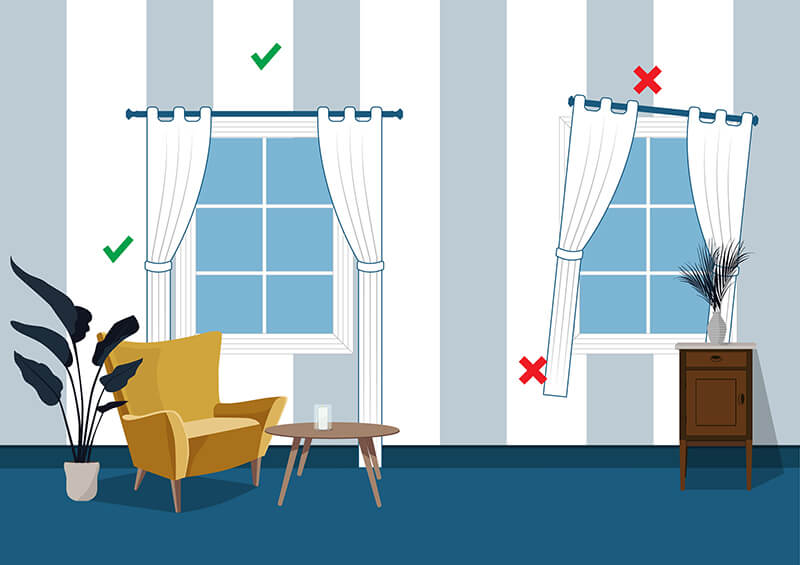
- DO use enough fabric. You want your curtains to feel full. If you plan to close your curtains from time to time, they should be 2-2.5 times the width of the window.
- DO measure carefully. Crooked curtains are an eyesore. They're not only a pain to rehang, they cause unnecessary damage and holes in your walls. Triple-check your measurements before hanging your curtains.
- DO factor in curtain hardware when measuring. When measuring curtain length, don’t forget to account for rod brackets and the rod itself. Skipping this step could leave you with curtains that are longer than expected and puddle on the floor.
- DO invest in sturdy curtain hardware. Weak rods and brackets can sag, break, or damage your walls. Choose a rod that supports your curtain’s weight—for example, a 10-foot rod holding 20-pound curtains should support at least 2 pounds per foot. Ensure you have the right style and number of brackets. Curtains over 30 inches need a center support bracket, and layered curtains require double rod brackets with additional center supports for wider windows.
- DO match your finish to your hardware. Kwik-Hang brackets come in five finishes — choose the one that matches your door handles, light fixtures, or other metal accents in the room.
- DON'T choose a curtain rod that is too narrow. Select a curtain rod that is 8-12 inches wider than your window to ensure your curtains always cover the sides of the window.
- DON'T make your curtains too short. The fabric should sweep the floor or puddle slightly. A few inches of puddling looks nice if you want a romantic look. But if you don't want them to drag or get dirty, stop the fabric just under an inch from the floor.
Frequently Asked Questions
How do you hang curtains without drilling holes in the wall?
Place a Kwik-Hang bracket at the top corner of your window trim, tap it in by hand or with a hammer, then slide your curtain rod into place. The brackets grip the wood with built-in pins — no screws, no wall anchors, and no holes. Install time: under 60 seconds.
What do you need to hang curtain rod brackets?
With Kwik-Hang no-drill brackets, you only need the brackets, a curtain rod, and your curtain panels. A hammer is optional for firmer wood trim. No drill, level, stud finder, or measuring tape required.
Do no-drill curtain brackets actually hold curtains securely?
Yes. Kwik-Hang brackets are load-tested to hold up to 20 lbs, which is strong enough for heavy-lined drapes, blackout curtains, and double-rod setups. The pins grip wood trim the same way a thumbtack grips a corkboard: fast in, surprisingly secure.
Can renters use no-drill curtain brackets without losing their security deposit?
Yes, because Kwik-Hang brackets tap into window trim, not the walls, they are an excellent curtain-mounting option for renters. When you remove them, there are no holes or marks to patch.
What type of windows work with Kwik-Hang brackets?
Kwik-Hang brackets work with windows that have traditional wooden trim or casing (not drywall, tile, metal, or plastic surfaces). Your window trim should be at least 1/2-inch wide for a secure fit. Have more questions? Visit our FAQ page.
How do you remove no-drill curtain brackets?
Simply lift the bracket out of the window trim. The pins release cleanly, leaving the wood undamaged. Kwik-Hang brackets can be removed and reinstalled multiple times, making them ideal for redecorating, painting, or moving.
How to Hang Curtains in Specific Situations
If you want to take your curtain-hanging game to the next level, try these new looks and techniques for hanging curtains in different situations.